ChatGPT is a language model developed by OpenAI. It is part of the GPT (Generative Pre-trained Transformer) series of models and is designed to generate human-like text based on the input it receives. If you have interacted with OpenAI ChatGPT, you have most likely done so using the Chat application. However, did you know that it also comes with an API for developing applications that connect to it directly?
This article will demonstrate communicating with OpenAI ChatGPT from a Quarkus application. For running, you'll need Java 17 installed.
Register for a OpenAI ChatGPT account
The first thing you will need is an OpenAI ChatGPT account. This is important because you must authenticate using a bearer token to access the API. Navigate to the OpenAI website and register for a new account if you do not have one. Otherwise, if you already have one, go ahead and log in.
Create an API key
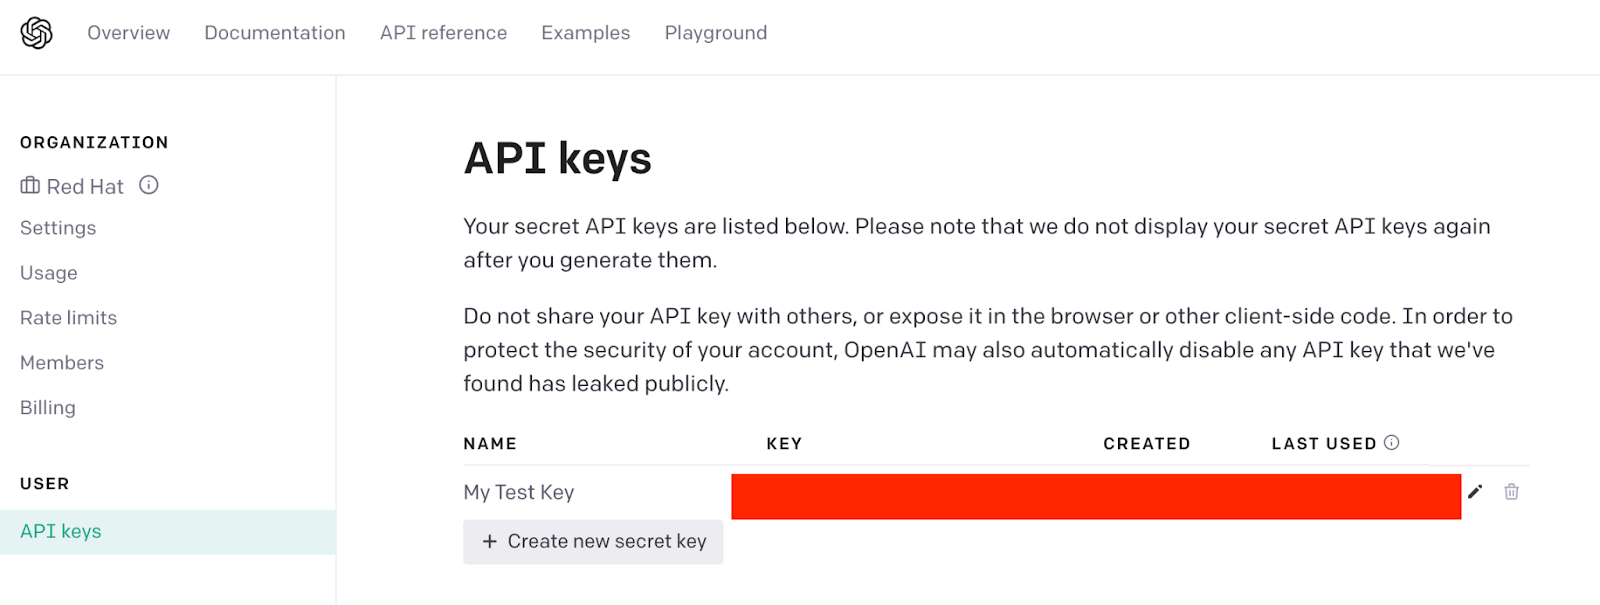
Once on the OpenAI website, create an API key to authenticate from the Quarkus application. Go to the OpenAI API page, click on the username (top-right), and select View API keys from the drop-down menu, as shown in Figure 1.

Click the Create new secret key button to create a new API key (Figure 2). You'll need to copy this key somewhere safe, as you'll need it later to authenticate in the Quarkus application. As the name implies, keep it secret!
The OpenAI ChatGPT API
The API for accessing OpenAI ChatGPT is complete and extensive, but we only need three elements for this example.
Requests to the ChatGPT API require the API key and a body with a specific format. The API key is sent in an authorization HTTP header using the standard Bearer format.
The request body should be in JSON format and contain model and message keys. The model value specifies the desired target version of the AI model for the request. The messages value contains an array of messages to feed into the chosen model. This message is a subdocument with two mandatory fields: role and content. The role is the user sending the message. The content is the message itself.
The following snippet shows an example of this body request:
{

    "model": "gpt-3.5-turbo",

    "messages": [{"role": "user", "content": "What is Java"}]

}
Scaffold the Quarkus application
Let's start by creating a Quarkus application.
Go to https://code.quarkus.io/ and generate a new Quarkus application with RESTEasy with the Reactive JSON-B and REST Client Reactive JSON-B extensions. These options can be prepopulated with all necessary dependencies by clicking this link.
Figure 3 shows the Quarkus generator page.

Click the Generate the application button, download the zip file, and unzip it.
Open the unzipped project in your IDE. In the following section, you'll create an interface to communicate with OpenAI's REST API.
Eclipse MicroProfile Rest Client
Quarkus integrates with the Eclipse MicroProfile Rest client to access external REST APIs. The MicroProfile Rest Client is a Java API that simplifies invoking RESTful web services.
To use MicroProfile Rest Client, you define a Java interface with annotations describing the REST API endpoints and methods. Then, you can inject instances of these interfaces into your application and use them to make REST calls.
Start by modeling the body content. Define the message field. This will contain the role and the content values described previously.
package org.acme;


public record ChatGptMessage(String role, String content) { }
Next, define the complete request body. This contains the model and list of messages as well as a static method to create the object for our particular use case:
package org.acme;


import java.util.ArrayList;

import java.util.List;


public record ChatGptRequest(String model, List<ChatGptMessage> messages) {


    public static ChatGptRequest newRequest(String model, String prompt) {

        final List<ChatGptMessage> messages = new ArrayList<>();

        messages.add(new ChatGptMessage("user", prompt));

        return new ChatGptRequest(model, messages);

    }


}
You also need to define the response. The response is a list of messages that are indexed.
package org.acme;


public record ChatGptChoice(int index, ChatGptMessage message) { }
The API response object contains the list of responses named choices in ChatGPT:
package org.acme;


import java.util.List;


public record ChatGptResponse(List<ChatGptChoice> choices) { }
The next step is to create a Java interface with the calls to the external service (in this case, the OpenAI ChatGPT API) that represents the endpoint contract. The endpoint is located at https://api.openai.com/v1/chat/completions, which uses the POST HTTP Method.
package org.acme;


import org.eclipse.microprofile.rest.client.inject.RegisterRestClient;


import jakarta.ws.rs.HeaderParam;

import jakarta.ws.rs.POST;

import jakarta.ws.rs.Path;


// Annotates the interface as a Rest Client

@RegisterRestClient


// Use Jakarta EE RS annotations to set the path of the endpoint

@Path("/v1/chat")

public interface ChatGptService {


    // Uses POST method

    @POST

    @Path("/completions")


    // Return body is automatically modeled

    public ChatGptResponse completion(


        // Sets this parameter as header parameter

        @HeaderParam("Authorization") String token,


        // Body content

        ChatGptRequest request);


}
You might have noticed that we've mapped the path /v1/chat/completions, but not the hostname. The hostname is configured in the application.properties file. The property to use is the fully qualified name of the interface (org.acme.ChatGptService) followed by the URL.
Open application.properties and copy the following property:
quarkus.rest-client." org.acme.ChatGptService" .url=https://api.openai.com
Now that all communication to the OpenAI API is complete, let's create a local REST endpoint to forward the requests to OpenAI ChatGPT. The body of this endpoint is a plaintext string sent directly to ChatGPT. You'll also inject some configuration values required by ChatGPT, like the model or the API key to authenticate.
package org.acme;


import org.eclipse.microprofile.config.inject.ConfigProperty;

import org.eclipse.microprofile.rest.client.inject.RestClient;


import jakarta.ws.rs.Consumes;

import jakarta.ws.rs.GET;

import jakarta.ws.rs.POST;

import jakarta.ws.rs.Path;

import jakarta.ws.rs.Produces;

import jakarta.ws.rs.core.MediaType;


@Path("/interact")

public class HelloChatGpt {


    // Injects the Rest Client interface created before

    @RestClient

    ChatGptService chatGpt;


    // Injects some of the required properties by Chat GPT

    @ConfigProperty(name = "openai.model")

    String openaiModel;


    @ConfigProperty(name = "openai.key")

    String openaiKey;


    // Endpoint definition

    @POST

    @Consumes(MediaType.TEXT_PLAIN)

    @Produces(MediaType.TEXT_PLAIN)

    public String completion(String prompt) {

        return chatGpt.completion(getBearer(),

            ChatGptRequest.newRequest(openaiModel, prompt))

        .choices().toString();

    }


    // Builds the Bearer token

    private String getBearer() {

        return "Bearer " + openaiKey;

    }

}
Before deploying the solution, the last thing to do is to configure the remaining parameters (model and API key) in the application.properties file:
openai.model=gpt-3.5-turbo

# Change this with your API key

openai.key=xxxxxxx
Run the application
To deploy the application, you will use the Quarkus Dev mode, as it's easier to use at this stage of development.
Open a terminal window and run the following command from the root directory of the project:
./mvnw quarkus:dev


__  ____  __  _____   ___  __ ____  ______

 --/ __ \/ / / / _ | / _ \/ //_/ / / / __/

 -/ /_/ / /_/ / __ |/ , _/ ,< / /_/ /\ \

--\___\_\____/_/ |_/_/|_/_/|_|\____/___/

2023-08-11 11:15:30,866 INFO  [io.quarkus] (Quarkus Main Thread) quarkus-chatgpt 1.0.0-SNAPSHOT on JVM (powered by Quarkus 3.2.1.Final) started in 2.780s. Listening on: http://localhost:8080


2023-08-11 11:15:30,878 INFO  [io.quarkus] (Quarkus Main Thread) Profile dev activated. Live Coding activated.

2023-08-11 11:15:30,879 INFO  [io.quarkus] (Quarkus Main Thread) Installed features: [cdi, rest-client-reactive, rest-client-reactive-jsonb, resteasy-reactive, resteasy-reactive-jsonb, smallrye-context-propagation, smallrye-openapi, swagger-ui, vertx]


--
And in another terminal window, let's send a request to our service asking "what is Java":
curl -X 'POST' \

  'http://localhost:8080/interact' \

  -H 'accept: text/plain' \

  -H 'Content-Type: text/plain' \

  -d 'what is Java'
It should return a response similar to the following:
[assistant : Java is a high-level, object-oriented programming language that was developed by James Gosling and his team at Sun Microsystems in the mid-1990s. It is known for its platform independence, meaning that Java code can run on any operating system that has a Java Virtual Machine (JVM) installed.
If you received a response similar to the preceding one, this means the Quarkus application is working as expected.
Congratulations! You sent a query to our Quarkus service, which in turn invoked OpenAI ChatGPT to find the answer and then returned the response to you.
Conclusion
You've seen that writing a Quarkus service that interacts with another REST service is not difficult. In this case, you have integrated with OpenAI's ChatGPT API, but it could be any other external HTTP API. All that is needed is to define an interface that reflects the API's contract and inject it using the @RestClient annotation wherever you want to use it.
You also used one of the key additions in Java, which is using records to map requests/responses from an external API. Records can be used in any other scenario, like creating POJOs (plain old Java objects).
Keep coding!
