Podman Desktop is the central place to work with containers as a developer. Podman Desktop uses the Docker, Podman, and Kubernetes APIs to communicate with container engines and Kubernetes clusters to provide users with a unified graphical interface across all these resources. It also provides extensions to help you manage these resources: install the Podman engine and Kubernetes clusters locally, configure access to remote Kubernetes clusters, configure access to images registries, install various commnd-line interfaces (CLIs), and more.
Architecture
The containers technology is a Linux kernel technology. On a Linux system, you can run Docker and/or Podman directly. On other systems like Windows and macOS, you will need to run a Linux instance inside a virtual machine and run Docker or Podman on this Linux instance, then access them from your system.
Containers on Linux systems
On Linux systems, Docker is running as a daemon and creates a socket so clients (including the Docker CLI) can access it through its API. The daemon receives commands from the clients and executes them to build containers, store images, etc. Podman, on the other hand, is daemonless. This means that the clients (including the Podman CLI) access directly the system resources (containers, filesystem, etc.) using a Podman library, to do these operations.
Podman can also run on Docker-compatibility mode. To run in this mode, a communication channel is created (a socket /var/run/docker.sock on macOS/Linux, a named pipe on Windows) and a Podman service runs, listening on this channel. This setup allows Podman resources to be accessed in two ways. The first way is by connecting to the Podman channel (for CLIs that have been originally designed to work with Docker only) the exact same way the Docker socket is accessed.
The second way is to use the Podman CLI (or the Podman library), which accesses the resources directly. Podman and Docker can still cohabit on the same system, by exposing different communication channels. Podman Desktop accesses the Docker daemon through the communication channel to work with Docker resources and uses the Podman CLI to work with Podman resources.
Containers on non-Linux systems
On Windows and macOS systems, a Linux system instance needs to be started inside a virtual machine. On this Linux system, Podman needs to be started as a service so it can be accessed from outside the virtual machine (your local system), through SSH. On these systems, Podman Desktop uses the remote version of the Podman CLI, which communicates with the service inside the virtual machine through an SSH connection.
Installation
Podman Desktop can be installed on macOS, Windows, and Linux systems, with x64 or arm64 architectures. New versions are released regularly and binaries for these releases can be found in the GitHub repository of the project. More detailed instructions for the installation are available. The installation procedure consists of installing a binary and its dependent files in your system. Once complete, you are ready to start Podman Desktop.
Onboarding
When started for the first time, Podman Desktop starts an onboarding session, as shown in Figure 1 and Figure 2. This session guides you through installing resources and tools that can be helpful when working with Podman Desktop. Podman Desktop checks for the following CLIs to be accessible on your system: docker-compose, kubectl, and podman. If any of these CLIs are not accessible, you are prompted to choose which ones you want to install and start the onboarding.
The onboarding consists of a series of steps for each tool to install. For the docker-compose and kubectl CLIs, the binaries are downloaded and placed in a system-wide directory (/usr/local/bin on Linux and macOS). For podman, on Linux, a step will help you install Podman using the package manager of your system. On macOS and Windows, the steps will first install the latest available version of Podman, then help you create a Podman machine. At any time, you will be able to manage these resources installed during initial onboarding. You can check if new versions are released for the CLIs and download them (Settings > CLI Tools), and you can manage Podman machines (Settings > Resources > Podman).


Images
To run containers, you first need images stored locally in your container engine. To have such local images, you can either build them from a Containerfile or Dockerfile or pull them, either from a public or a private container registry. You might also want to push images built locally into a distant registry. All these operations are available from the Images List page, visible in Figure 3.

Building an image
In Figure 4, you can see how to build an image, based on a Containerfile and store the resulting image on a container engine (here, Podman container engine is selected—the choice may be not visible if only one container engine is detected by Podman Desktop). You also have the option to build a single-platform or a multi-platform image, by choosing which platform(s) you want to build the image.

Pulling an image from a registry
You can pull an image from a public registry by giving the URI of the image to pull and the container engine on which to store it locally. If the image you want to pull happens to be private and you need to use credentials to access it, you can register these credentials from the Settings > Registries page (Figure 5), or by clicking the Manage registries button from the Pull image page (Figure 6). The credentials will be saved for any future use from Podman Desktop.


Pushing an image to a registry
Once you have an image locally stored in any container engine, you can push it to a registry, as shown in Figure 7. You first need to be sure that the image name contains the URI of the remote repository. If it has not been done during the image build, you can edit the image and change its image name. Then, you can push the image to the registry by using the dedicated command. Both Edit Image and Push Image commands are available from the Actions menu of the image, in the Images List page, or from the Image Details page, accessible by clicking the image name in the Images List. If the repository is private, you will have to check that the credentials have been registered, as described in the previous section.

Containers
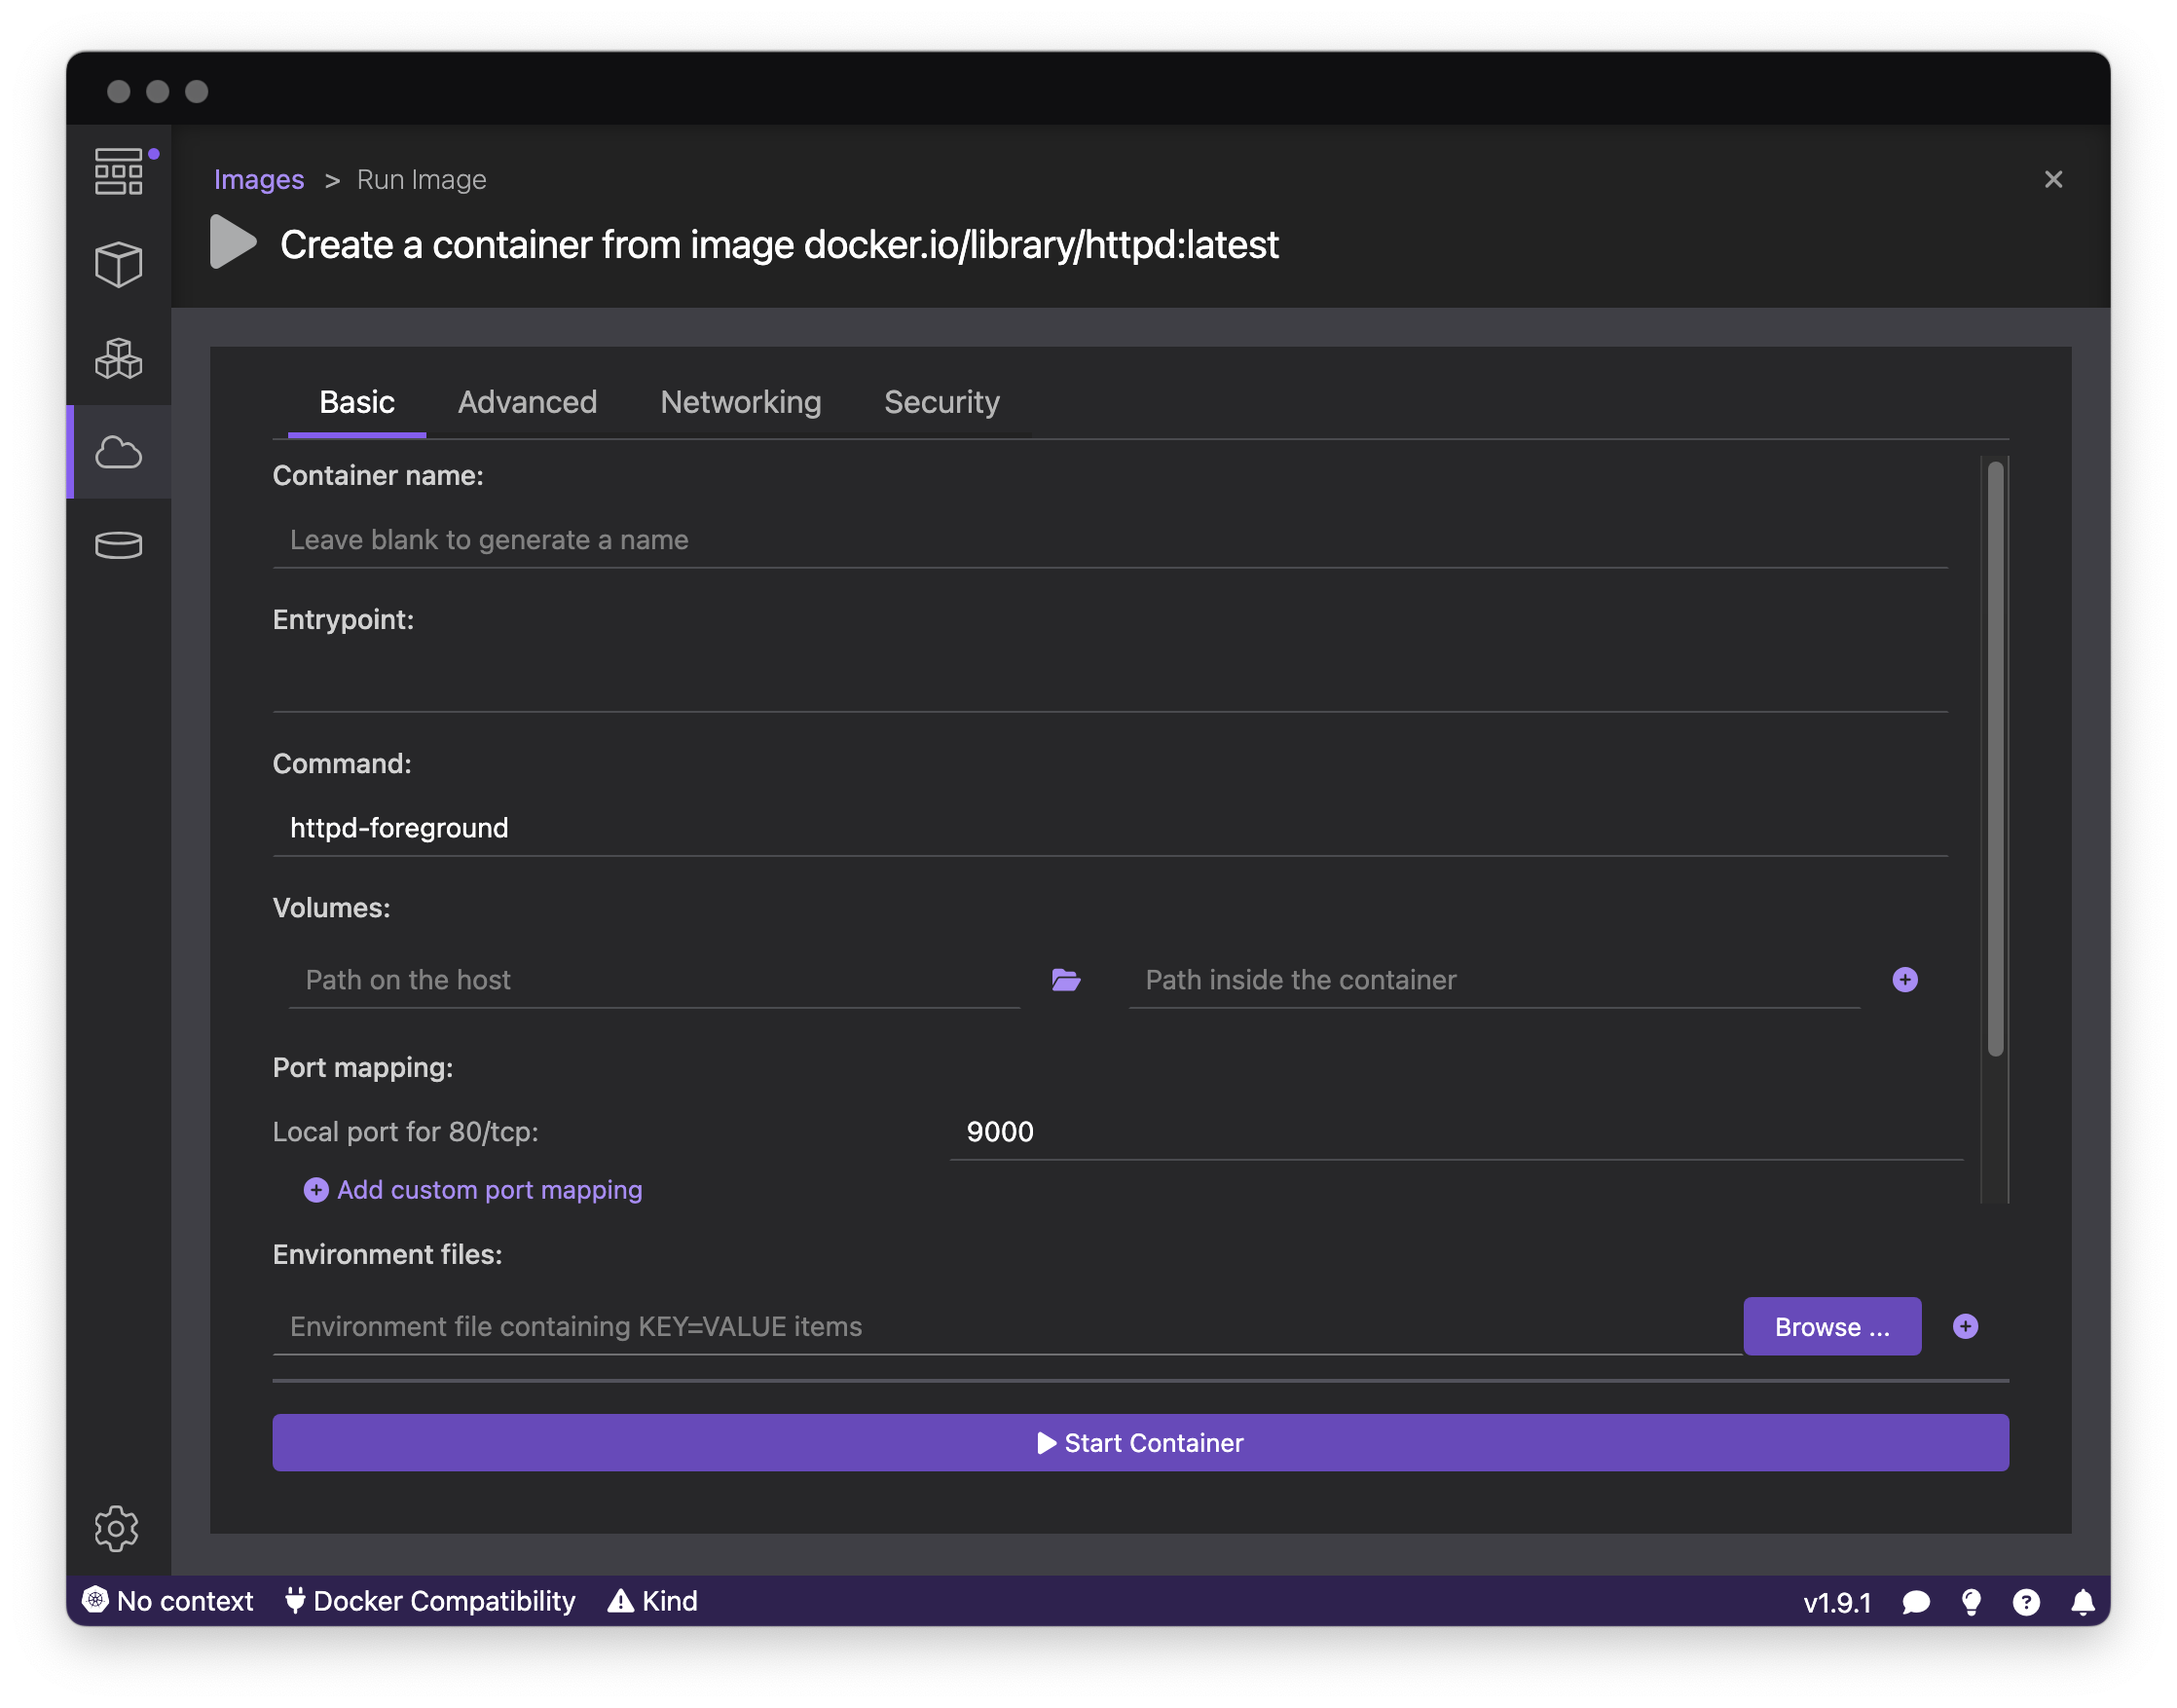
Now that you have at least one image stored locally in a container engine, it's time to start a container using this image in this same container engine. See Figure 8. For this, you can click the Run Image button in the Actions menu of the desired image in the Images List. This will open a form with all the possible parameters for creating the container (the same parameters you may pass to the podman-run command). Once you click the Start Container button, the container creation is initiated.
Upon completion, you are redirected to the Details page for the container. You can go back to this details page at any time by clicking the container's name in the Containers List page. This Details page offers you information about the container through dedicated tabs. These include real-time logs of the container, detailed information (equivalent to the output of the podman-inspect command), a Kubernetes representation of a pod embedding this container (we will see later in the Kubernetes section how this can be useful), and a view of the TTY attached to the container.
It is also possible to access an interactive shell within the container (if the container provides an sh or bash shell), by accessing the Terminal tab of the Details page (Figure 9). A toolbar provides the standard operations on containers: stop, delete, restart. Additionally, you can open, in one click, your browser to the port declared as exposed by the container, to check that the application running in the container works as expected.

Pods
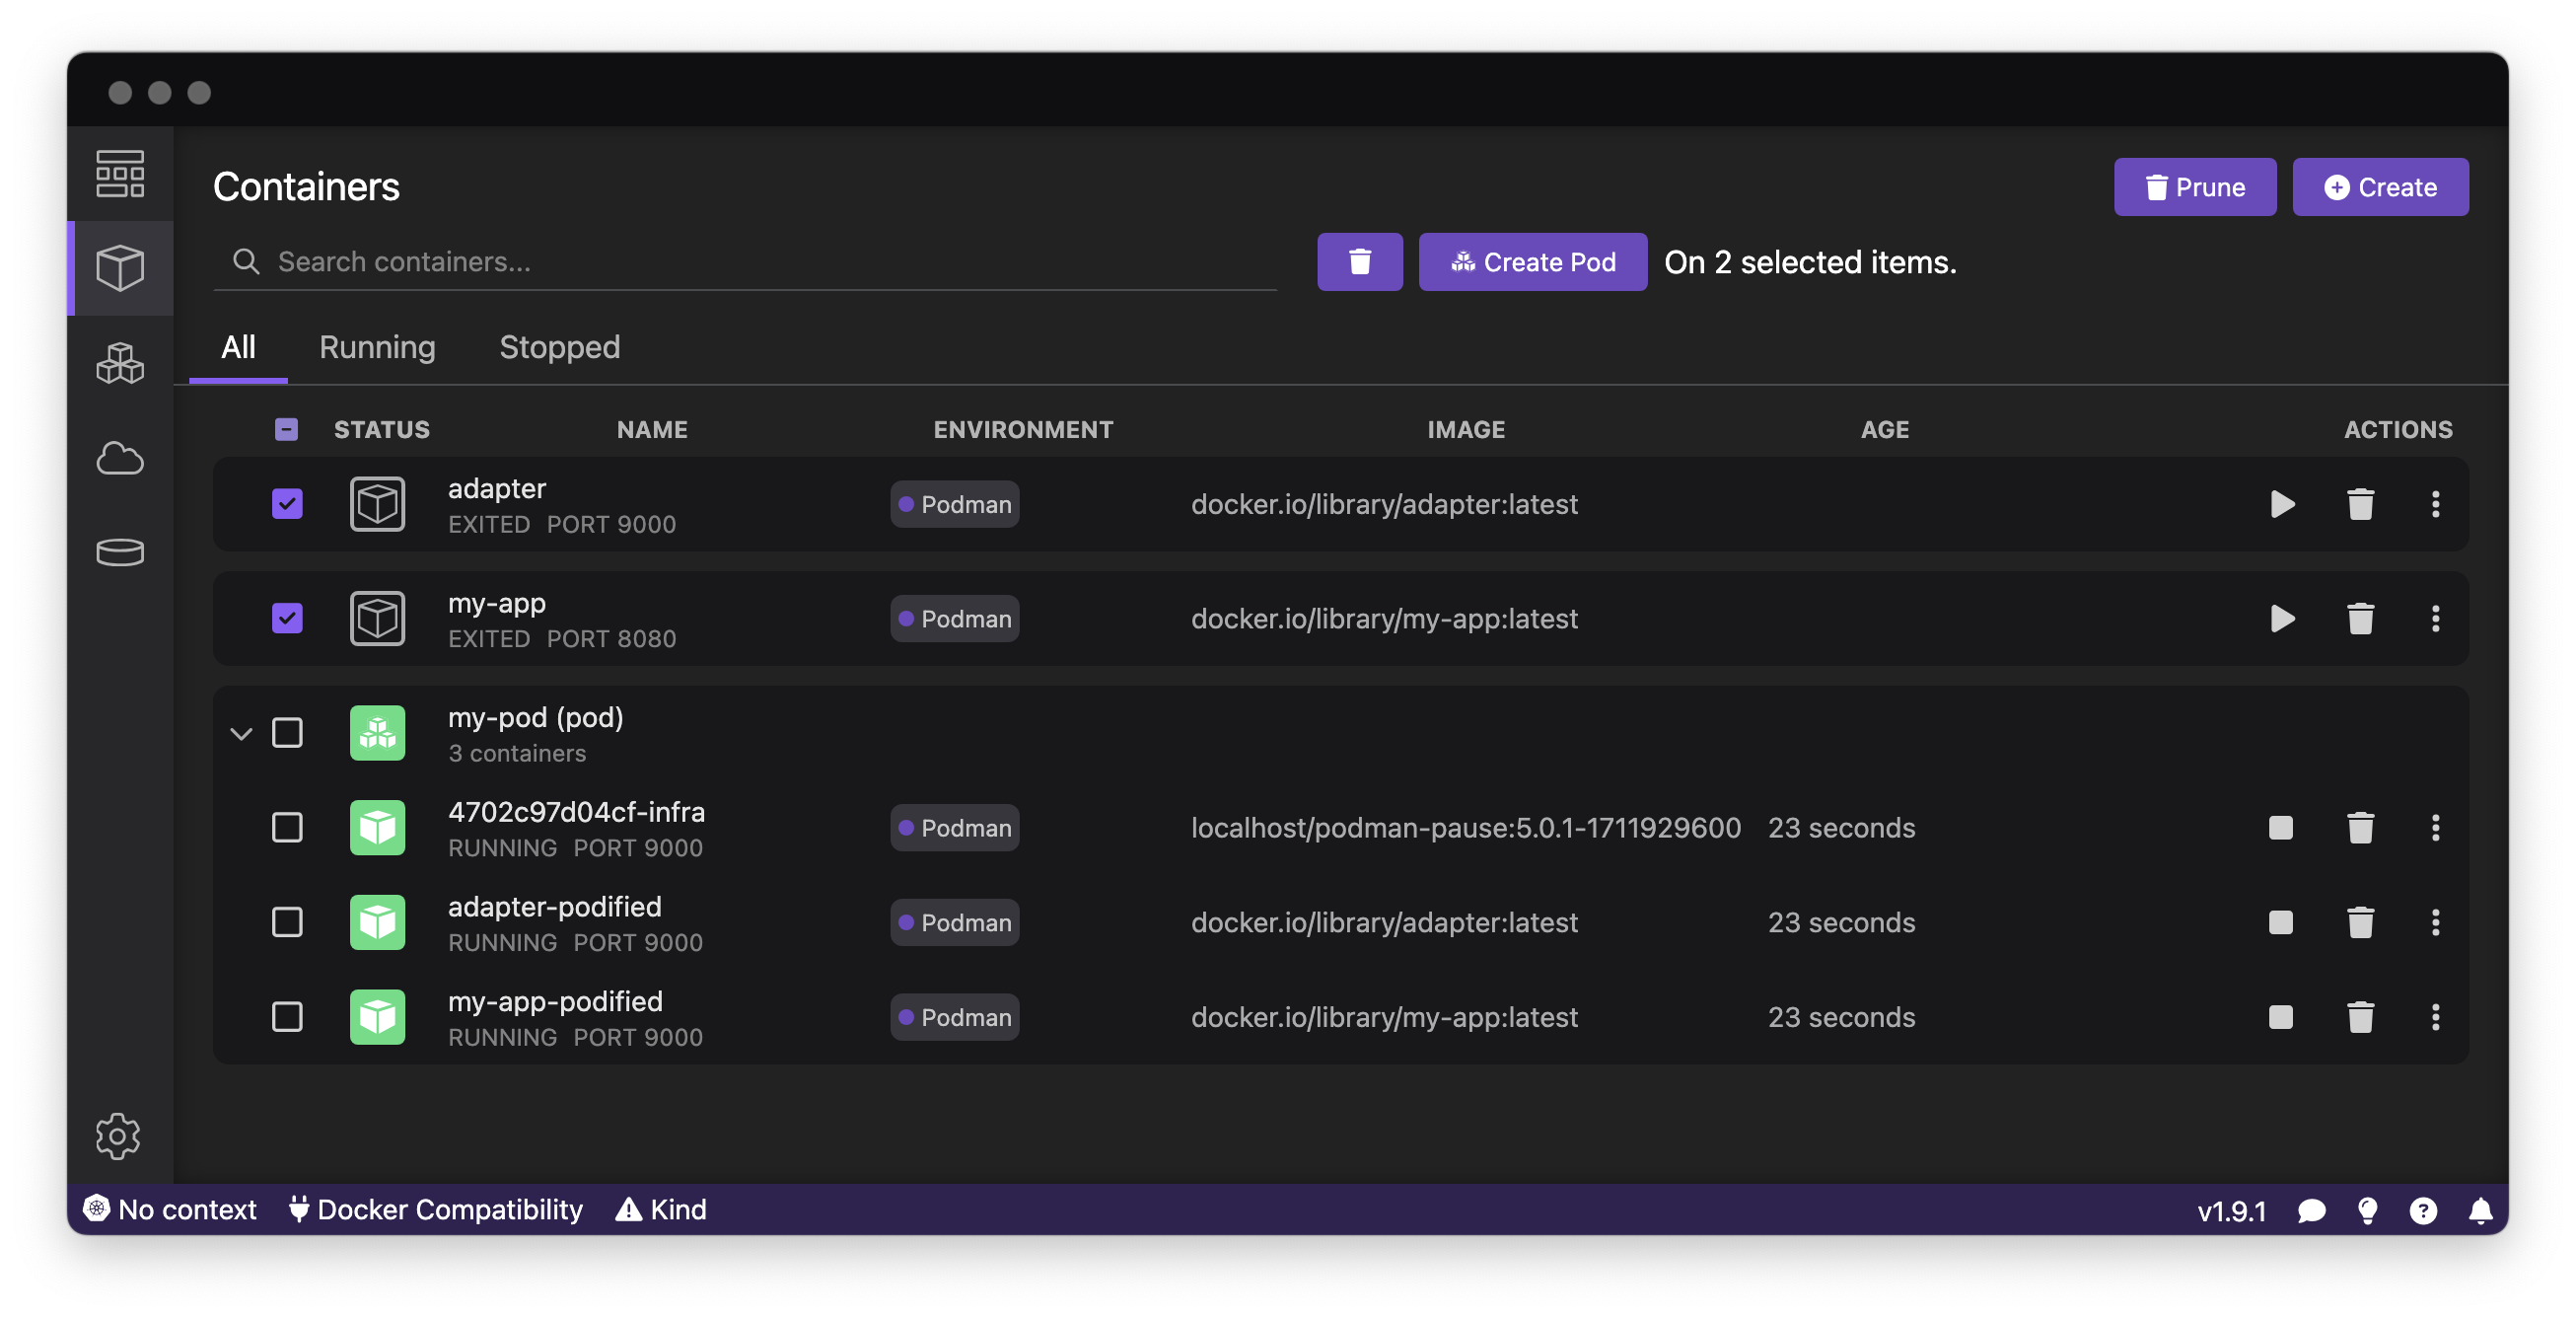
Podman, like Kubernetes, can manage pods. If you are not familiar with the Kubernetes concepts, a pod is a group of containers sharing resources. For example, containers within a pod can communicate on localhost, and can share files on a same volume. With Podman Desktop, from the Containers List page, you can select one or several containers and click the Create Pod button to create a new pod with a copy of these containers, as shown in Figure 10.
Once done, the previous containers are stopped, and a pod is created containing copies of the selected containers (plus an infra container, which is a technical container needed to run a pod). You can stop, delete, and restart the pod at any time from the Pods List page (Figure 11).
Additionally, from the Pod Details page of a specific pod, you can see the logs of the containers streamed in real-time, detailed information about the pod (equivalent to the output of the podman-pod-inspect command), and a Kubernetes representation of the pod. A toolbar provides standard operations on pods such as stop, delete, and restart. Moreover, you can open the exposed port of the pod in your browser with a single click to verify that the application running in the pod functions as expected.

Compose
If you use compose to run multi-container applications, Podman Desktop can help you manage these groups of containers. In the Containers List page, all containers started by the same instance of compose are grouped together. This grouping allows you to manage them as an application by stopping, deleting, or restarting the application.
By clicking the name of the group (the name followed by compose in the first line of the group), you can access the Details page for the application, where you can see the logs of the containers streamed in real-time, the detailed information of the containers (the output of the podman-inspect command on each container), and a Kubernetes representation of a pod containing the containers. In Figure 12, you can see that two applications have been started with two instances of compose (one nginx-golang-postgres and one flask-redis).

Kubernetes
Podman Desktop provides extensions to install Kubernetes clusters locally and to access remote clusters.
Local Kubernetes clusters
The kind extension is installed by default. This extension makes it possible to run local Kubernetes clusters on containers using the kind command. If you don't already have the kind CLI installed on your system, a ⚠ Kind button appears in the status bar to guide you through its download and installation (Figure 13).
Once installed, go to Settings > Resource. A Kind section should be present, and from there you can create new clusters as well as manage the clusters you have created. Any Kind clusters you create will appear as containers in the Containers List page with a dedicated Kind icon. The minikube extension offers the same experience via the minikube CLI.

Kubeconfig file
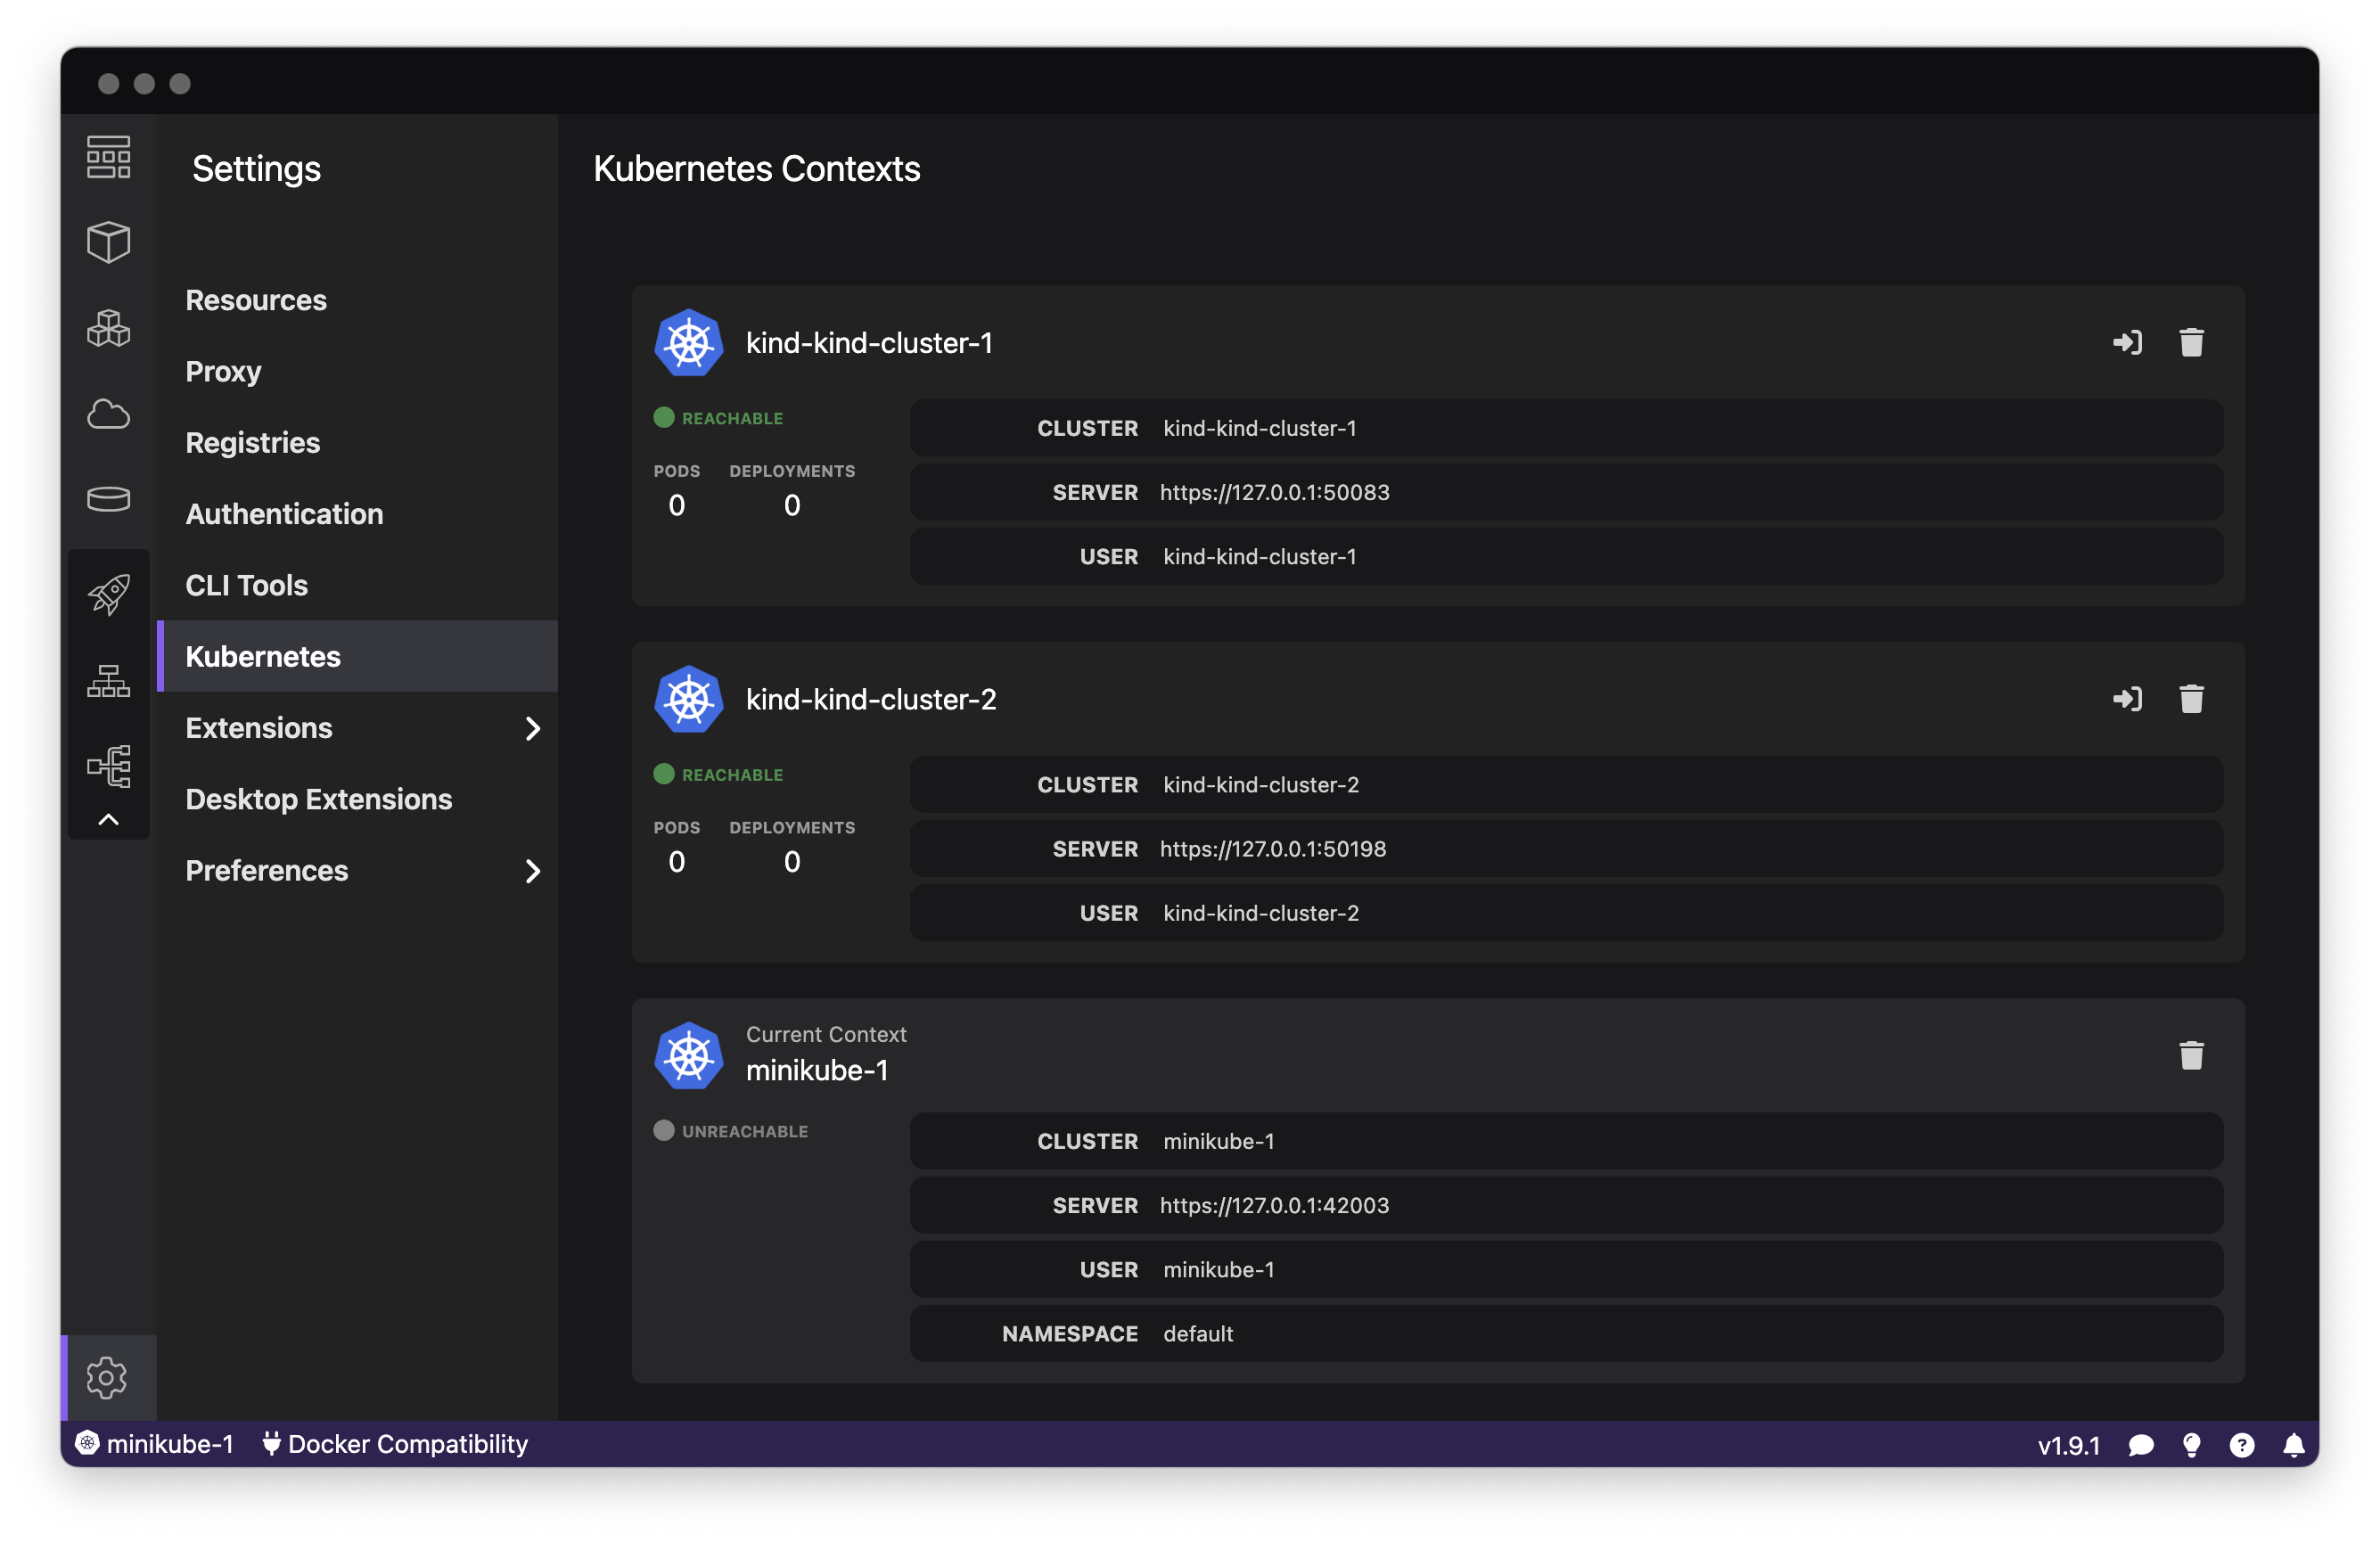
Podman Desktop detects your kubeconfig file (you can configure its location if you want to use a file different from the default ~/.kube/config one, in Settings > Preferences > Kubernetes). When such a file is detected, Kubernetes-related icons are added to the menu—Deployments, Services, and Ingresses & Routes. You can select a context from this kubeconfig file, either from the status bar selector or from the Kubernetes Contexts page, as depicted in Figure 14.
The Kubernetes Contexts page (accessible via Settings > Kubernetes) displays the list of contexts defined in the kubeconfig file, and you can switch the context from this page. For each context, it is displayed if the cluster is accessible, and, if so, how many pods and deployments are present in the context. This should help you make some cleanup from time to time in your kubeconfig file, as these files tend to grow over time.
Moving from non-orchestrated containers to Kubernetes
Podman Desktop provides tools to help you move your usage of containers to Kubernetes.
Pushing local images to cluster's node
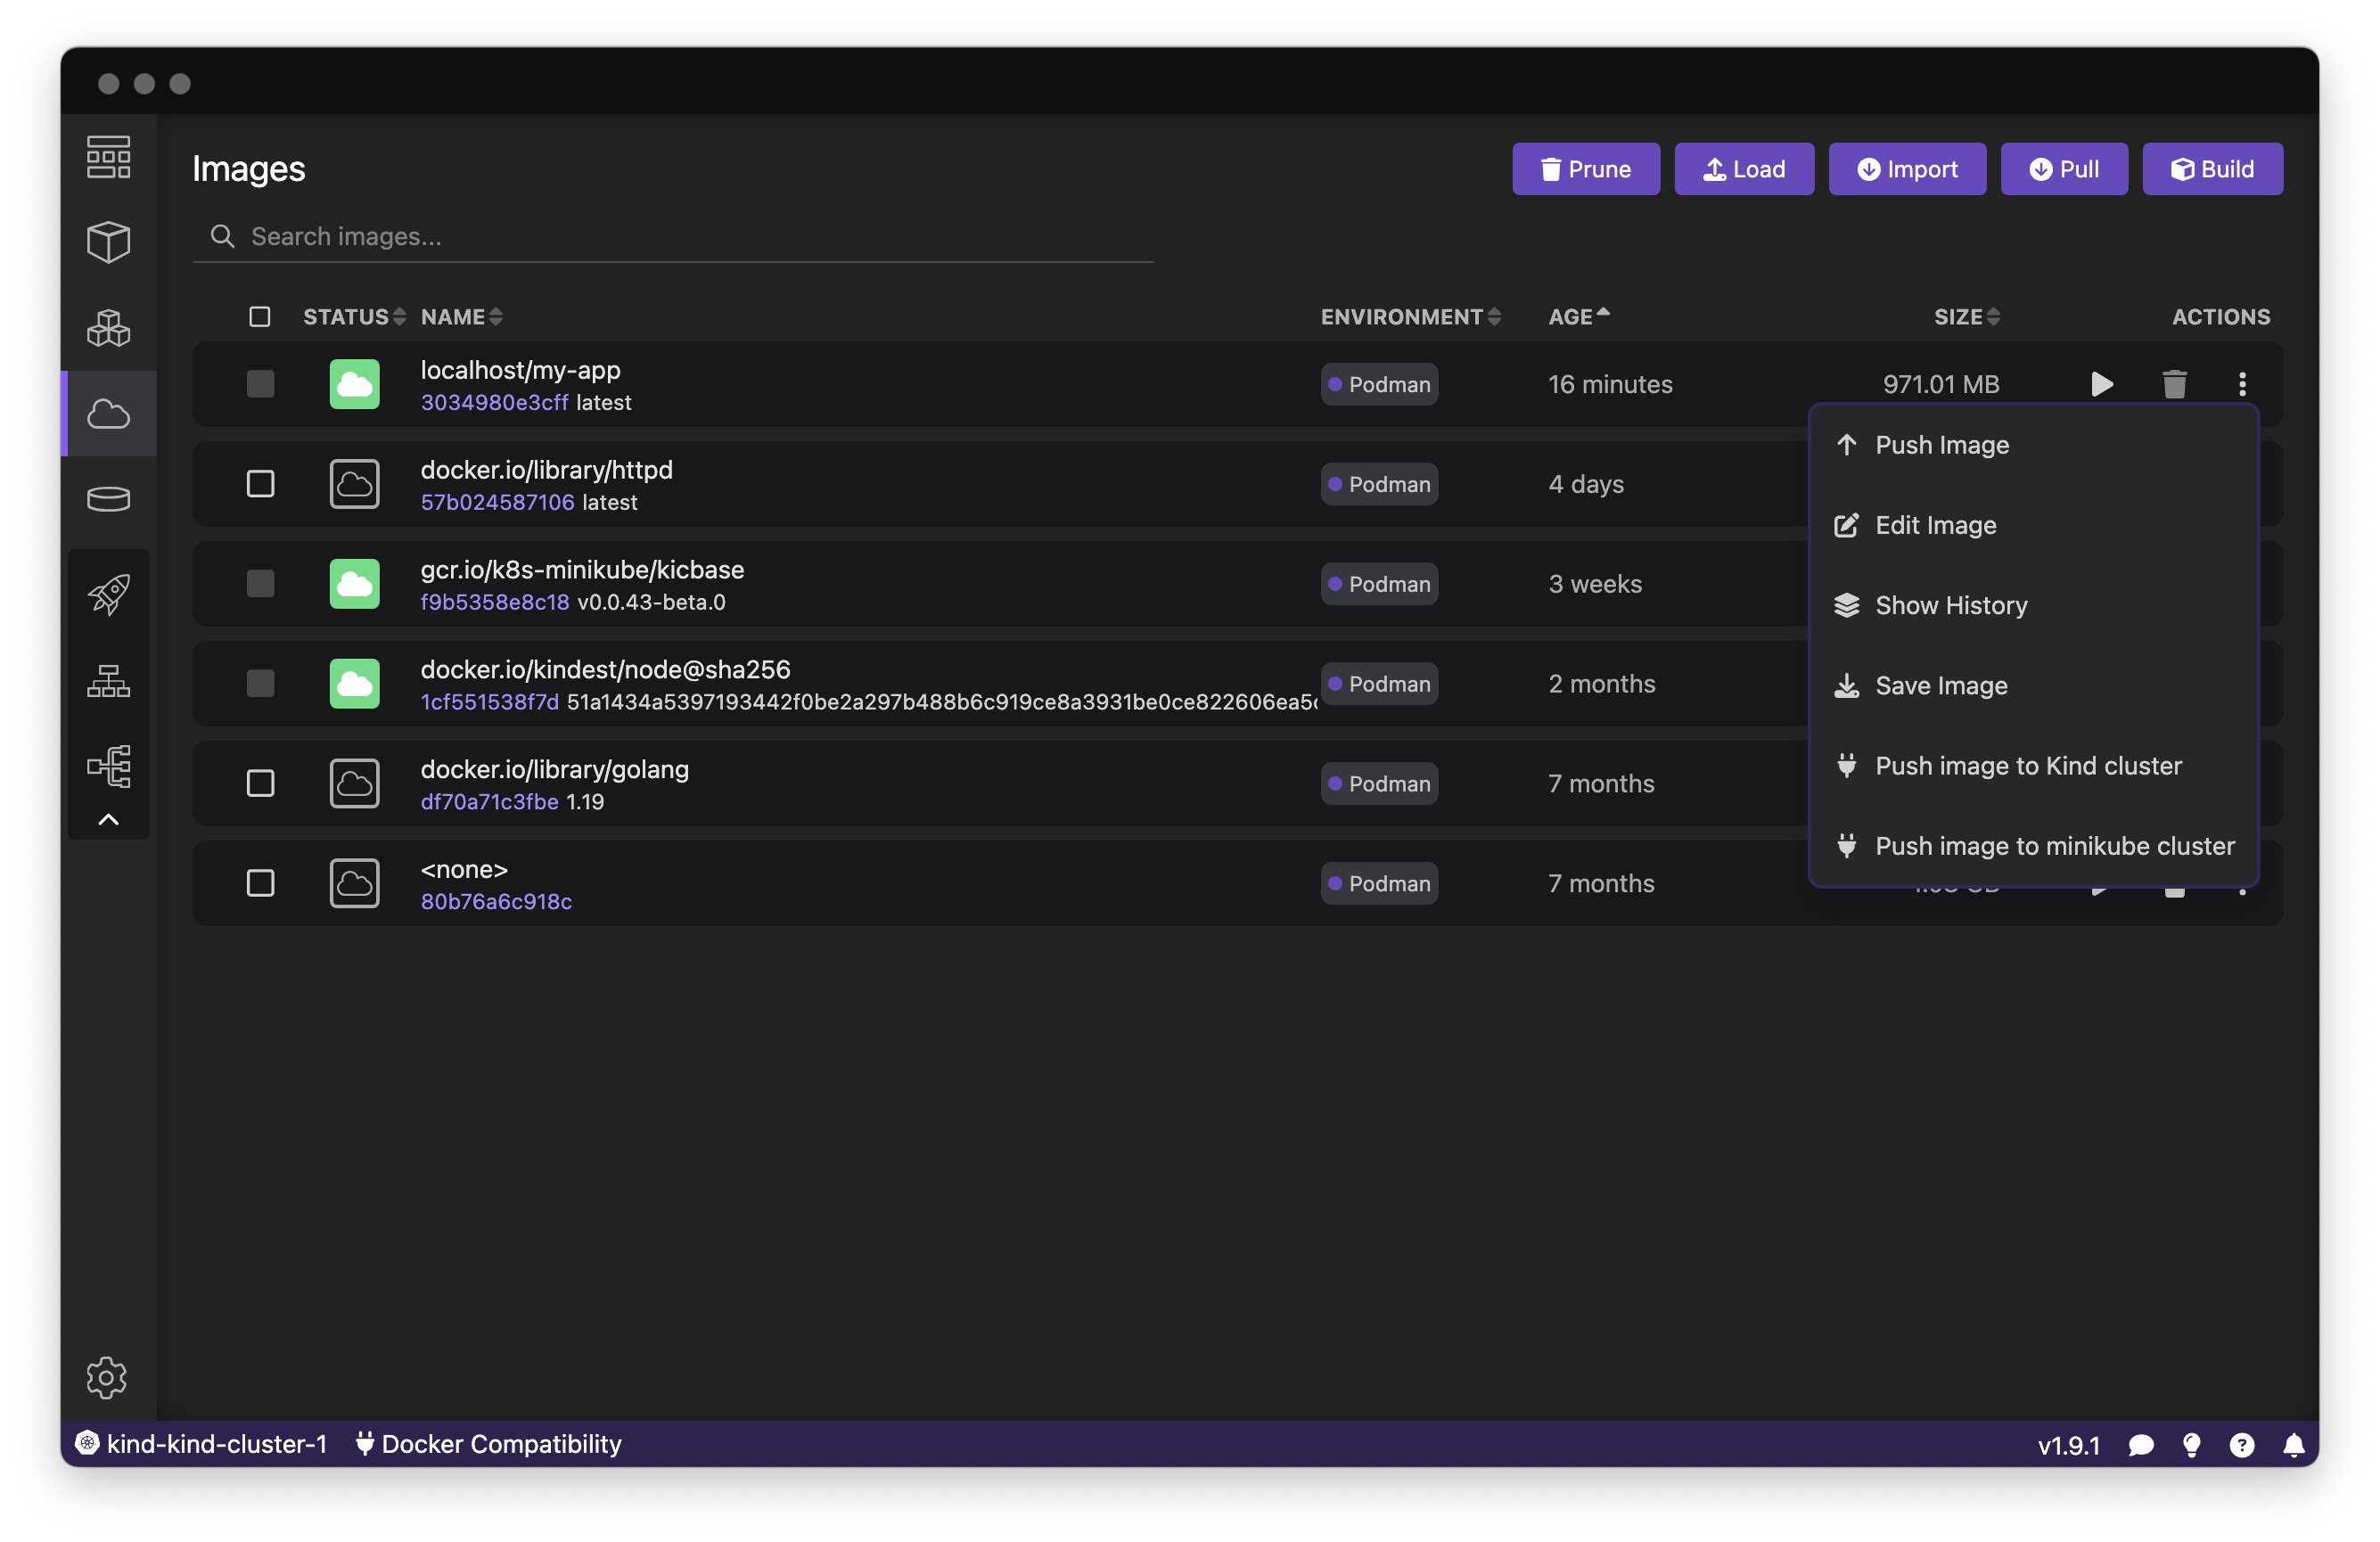
The first very helpful tool is to upload images stored in the local container engines to Kubernetes nodes. It is interesting to know that when you deploy a pod into a Kubernetes node, the images of the pod's containers will be either pulled from the corresponding registries, or, if an image is stored (cached) in the node's container engine, it will be used instead.
In addition to saving bandwidth, this feature is particularly helpful for images built locally: you don't have to push them to a specific registry (and, if you don't want to rely on a third-party registry, you don't have to manage your own registry), you just need to have it stored in the container engine of the node of the Kubernetes cluster. You will be able to do this from the Images List page in the Actions menu for an image. In this menu, an entry for each kind of cluster should be present to push the image to a cluster of this kind (Figure 15).
Deploying a local container to a Kubernetes context
Another very helpful tool is to "copy" a container running in a local container engine to a Kubernetes cluster by creating a pod running this container in the cluster. To do this, you can choose a container in the Containers List page and select the Deploy to Kubernetes action, as shown in Figure 16. This shows you the Kubernetes manifest that has been generated, which will be used to create the pod in the cluster, and lets you select a few options. After clicking the Deploy button, the Kubernetes manifest will be "applied" to the cluster, and you should be able to see the created pod in the Pods List page.

Managing Kubernetes resources
In the Pods List page, you will see both the pods managed by Podman and the pods running in the current Kubernetes context, the Environment column displaying where each pod is running. By clicking the name of a Kubernetes pod, you will access the details of the pod, including the logs of the pod's containers streamed in real-time, a summary of the pod specification and status, and the possibility to access an interactive shell within the containers of the pod (for containers providing an sh or bash shell). In the Deployments, Services, and Ingresses & Routes pages, you will see the corresponding resources existing in the current Kubernetes context.
Conclusion
Podman Desktop is extensible. In fact, most of the features we have seen in this article are provided by extensions. An API is provided to write extensions in JavaScript or TypeScript. Extensions can register providers (authentication, registry, Kubernetes, containers, CLI tool, etc.), listen to events (on images, containers, pods, etc.), contribute entries to menus (tray menu, status bar, contextual menus), and render a complete UI through a web view provided by the API. Many extensions already exist, and many more are expected to come, which will make Podman Desktop a top choice among developers working with containers.
