Image mode for Red Hat Enterprise Linux (RHEL) is a powerful way to build, deploy, and manage operating systems just like containerized applications. As a prerequisite, please run through our quick start guide to become familiar with and build a bootc container image that we will reference. This article assumes that the reader has already created the container images in the quick start guide and they are available via an accessible registry.
Here, we’re going to focus on deploying a bootc container image in a bare metal environment. Specifically, we’ll boot the systems from the network (PXE or HTTP Boot) and use kickstart to automatically install the bootc container image. This is a really common pattern for large-scale provisioning that lends itself well to automation. Not only is this a great way to provision in a data center, but it’s especially useful for environments that need a high degree of consistency and/or get re-provisioned more frequently. Some examples include HPC & grid environments, Hadoop, build farms, numerous edge scenarios, etc. Let’s kick this off! (Pun intended.)
Creating a kickstart file
Kickstart is a simple answer file that will automate the RHEL installer, also known as Anaconda. It provides a powerful set of options that configure the OS, define the rpms to install under %packages, and also allows scripts to run before or after the install using the respective %pre and %post sections. When we pair kickstart with image mode, the scope shrinks as many of the installer functions will be performed via container file and persist within the container image.
Disk partitioning
Container images do not have the concept of file systems or partitioning. Kickstart is going to setup our partition and file system layout and then extract the container image on the system. The TL;DR with partitioning is that we expect the majority of current partitioning schemes to "just work" with image mode. Having said that, this may be an opportunity to simplify an older scheme that developed over years or possibly decades. As image mode has native transactional updates and rollbacks, it may not require some of the complexity used to emulate these capabilities. It’s common to inspect the hardware in the %pre section and then make partitioning decisions based on the storage. Functionality like this will work beautifully as expected.
Use ostreecontainer instead of %packages
As the name image mode implies, we’re deploying the operating system as an image. Image mode requires that rpms be installed during the container build process. This means the use of the %packages section is unsupported and instead we’ll pass ostreecontainer --url [registry/image:tag] to tell the installer which container image to install. If you are adapting an existing kickstart, this is the main tweak that enables image mode.
Registry authentication and certificates
Many users will undoubtedly use on-premise registries that require authentication and/or certificates. We can handle auth and certificates, but keep in mind that we’ll need to provide certs/auth both inside the container image and as well as via kickstart. This ensures that both the installer will have access to the registry as well as bootc on the running system, allowing updates to be pulled from the registry. If this describes your environment, please see the full details here. At minimum, to get the image installed from a registry with authentication, we can pass the auth secret in the %pre section of the kickstart as follows:
%pre
mkdir -p /etc/ostree
cat > /etc/ostree/auth.json << 'EOF'
{
        "auths": {
                "quay.io": {
                        "auth": "<your secret here>"
                }
        }
}
EOF
%end
System specific configs
In general, we want to put as much configuration into the container image as possible, but this has limits with options that need to be machine-specific. We can also use kickstart to do things at an instance level, similar to how cloud-init is commonly used to configure cloud instances (which totally works with image mode too!) Common examples include things like hostname, static networking configurations, and possibly users and passwords. There are likely use cases where some of these *should* be included in the image, and other times where setting this during provisioning is better. It shouldn’t be too hard to find the balance between your current operational patterns and what makes sense to include in your images vs. deployed systems.
Example kickstart
In the example below, we’re going to use a standard LVM+XFS setup where /var and /var/log are in separate logical volumes. We’ll deploy your container image that was created from the quickstart above. Then we’ll use the %post section to change the LAMP stack and run caddy instead. We probably wouldn’t recommend something like this in production, but it’s illustrative for how you can inject files during kickstart, similar to what’s common with cloud-init for cloud instances. Once you have this file, fill in the highlighted sections, make any customizations for your environment, and copy it to an internal web server. It’s a common practice to host kickstarts on the same infra that is hosting the installation media described in the next section. See below:
text
network --bootproto=dhcp --device=link --activate
# Full disk use, separate LV for /var & /var/log
clearpart --all --initlabel --disklabel=gpt
reqpart --add-boot
part pv.01 --size=40208 --grow #--ondisk=sda
volgroup vg_rhel pv.01
logvol / --vgname=vg_rhel --size=25200 --name=lv_root --fstype=xfs
logvol /var --vgname=vg_rhel --size=1024 --grow --name=lv_var --fstype=xfs
logvol /var/log --vgname=vg_rhel --size=10240 --name=lv_log --fstype=xfs
logvol swap --recommended --vgname=vg_rhel --name=lv_swap --fstype=swap
firewall --disabled
services --enabled=sshd
reboot

# Add the container image to install
ostreecontainer --url quay.io/[my_account]/lamp-bootc:latest
# optionally add a user
user --name=core --groups=wheel --plaintext --password=changemme
sshkey --username core "ssh-ed25519 AAAAC3Nza....." #paste your ssh key here
# if desired, inject a SSH key for root
rootpw --iscrypted locked
sshkey --username root "ssh-ed25519 AAAAC3Nza....." #paste your ssh key here

%post
#Here we can do things like register to Red Hat Insights or another management platform, inject files, even define how a container should run via quadlet & podman. The sky is the limit and we encorage you to explore what's possible here. In the meantime, let's start a different reverse proxy on ports 80 & 443!

#disable the original services we have in our image.
systemctl disable httpd mariadb php-fpm # in real life we would probably build a new image.

#Here's a basic quadlet that will fire up caddy. You can add a Caddyfile if you like.
cat > /etc/containers/systemd/caddy.container << EOF

[Unit]
Description=Caddy Quadlet
After=network-online.target
[Container]
Image=docker.io/library/caddy:latest
ContainerName=caddy
AutoUpdate=registry
PublishPort=80:80
PublishPort=443:443
Network=host
[Service]
Restart=always
TimeoutStartSec=900
[Install]
WantedBy=multi-user.target default.target
EOF

%end
Prepare a PXE environment
If you are new to creating a network booting environment, take a look here to get started. Complete configuration of DHCP, HTTP, and TFTP are outside of the scope of this article and likely wouldn’t be helpful for your environment. The configs/steps provided below should be simple to adapt to most environments. This example will also assume the clients are using UEFI firmware, as it’s 2024. The simplest way to set this up is to download the corresponding Installer for the version you are deploying. This example was written for 9.4 and uses the RHEL 9.4 Boot ISO. The installer media contains all of the components we’ll need to serve over the network. Simply mount the ISO and copy the contents to the respective directories used by your TFTP and HTTP servers:
#mount the ISO
mount rhel-9.4-x86_64-boot.iso /mnt

#copy the contents to the default tftp path
mkdir -p /var/lib/tftpbootl/rhel9.4
cp -r /mnt/* /var/lib/tftpboot/rhel9.4/

#adjust permissions for grub:
chmod -R 775 /var/lib/tftpboot/rhel.9.4

#also make the files available via http
cp -r /var/lib/tftpboot/rhel.9.4 /var/www/html/
Next, we’ll edit the GRUB menu to pass our kickstart config and ensure the paths are correct for our boot files:
Edit: /var/lib/tftpboot/redhat/EFI/BOOT/grub.cfg:
### BEGIN /etc/grub.d/10_linux ###
menuentry 'Install Red Hat Enterprise Linux 9.4' --class fedora --class gnu-linux --class gnu –class os {
  linuxefi /images/pxeboot/vmlinuz inst.stage2=http://PATH_TO_HTTP_SERVER/rhel9.4 quiet inst.ks=http://PATH_TO_HTTP_SERVER/imagemode.ks
        initrdefi /images/pxeboot/initrd.img
}
The magic that makes PXE work is the DHCP server will pass an option to load the shim as our NBP, or network boot program, from the environment we just created: /rhel9.4/EFI/BOOT/BOOTX64.EFI. It is critically important that your DHCP server is configured properly for this to work.
Bonus: Forget TFTP—UEFI HTTP Boot is better
PXE has existed for decades and has a few drawbacks that stem from the use of TFTP. Fortunately, its successor is potentially easier to configure, faster, and works great with TLS and Secure Boot. This does assume your DHCP environment supports HTTP boot (unfortunately not all of them do), and your hardware has proper firmware support (unfortunately not all of them do). To experiment with this locally on a RHEL or Fedora system using virtualization check out this post.
First, if you’re using dhcpd (dnsmasq and Microsoft DHCP also support this), add a stanza like this to pass the NBP, which will appear to clients as the “Boot file name” in the DHCP offer packet:
class "httpclients" {
option vendor-class-identifier "HTTPClient";
match if substring (option vendor-class-identifier, 0, 10) = "HTTPClient";
filename "http://PATH_TO_HTTP_SERVER/rhel9.4/EFI/BOOT/BOOTX64.EFI";
}
The only other tweak we need to make is to ensure the paths are correct in GRUB on your HTTP server.
Edit: /var/www/html/rhel9.4/EFI/BOOT/grub.cfg:
### BEGIN /etc/grub.d/10_linux ###
menuentry 'Install Red Hat Enterprise Linux 9.4' --class fedora --class gnu-linux --class gnu –class os {
  linuxefi /rhel9.4/images/pxeboot/vmlinuz inst.stage2=http://PATH_TO_HTTP_SERVER/rhel9.4 quiet inst.ks=http://PATH_TO_HTTP_SERVER/imagemode.ks
        initrdefi /rhel9.4/images/pxeboot/initrd.img
}
Clients should now be able to boot and install directly from the firmware via an option that will look similar to Figure 1.
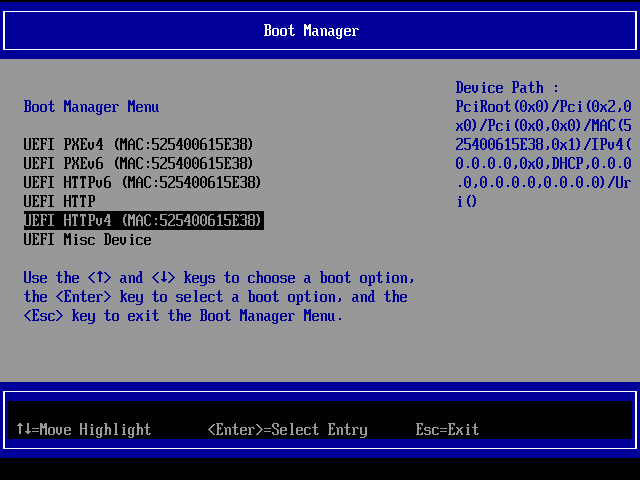
Regardless of PXE or HTTP Boot, systems will be directed to load the shim -> GRUB -> anaconda with our kickstart config and automate the installation which will pull the container image from our registry.
Wrap it up
At this point, you should be able to 1) use container tools to create OS images (quickstart), 2) create new or adapt existing kickstart configurations, and 3) scale bare metal deployments using PXE or HTTP Boot. From here we’d recommend assessing workloads and/or use cases that would benefit from the build & run time advantages of image mode and try creating a Containerfile file, image, and kickstart to deploy these. Additional automation and runtime configuration can always be provided using Ansible Automation Platform, and this can reduce the number of kickstarts that need to be maintained in a shop that has a lot of images and configurations.
We hope this was useful and helps demystify how we can make containers boot!
Definitely check our Podman Desktop with the Red Hat Extension Pack. It’s a great tool to work with containers and image mode for RHEL.
Last updated: November 4, 2024